I posted this to the Facebook Antique Typewriter Maintenance group last week, but nobody had tried the shrinktube platen re-covering method on an H3K yet…

So, since nobody had tried, I needed to do it myself to make sure that the slightly larger-diameter platen would still work within the tolerances of the Hermes 3000 carriage. Fortunately, C.A. Bennett had done the DIY shrinktube method on some of her machines, and had some tubing left over that she generously sent to me to use for the experiment. The smallest roll you can buy of this stuff is 25ft, so if you do this, you may want to share the cost with a buddy unless you have 20+ platens to re-cover. (:
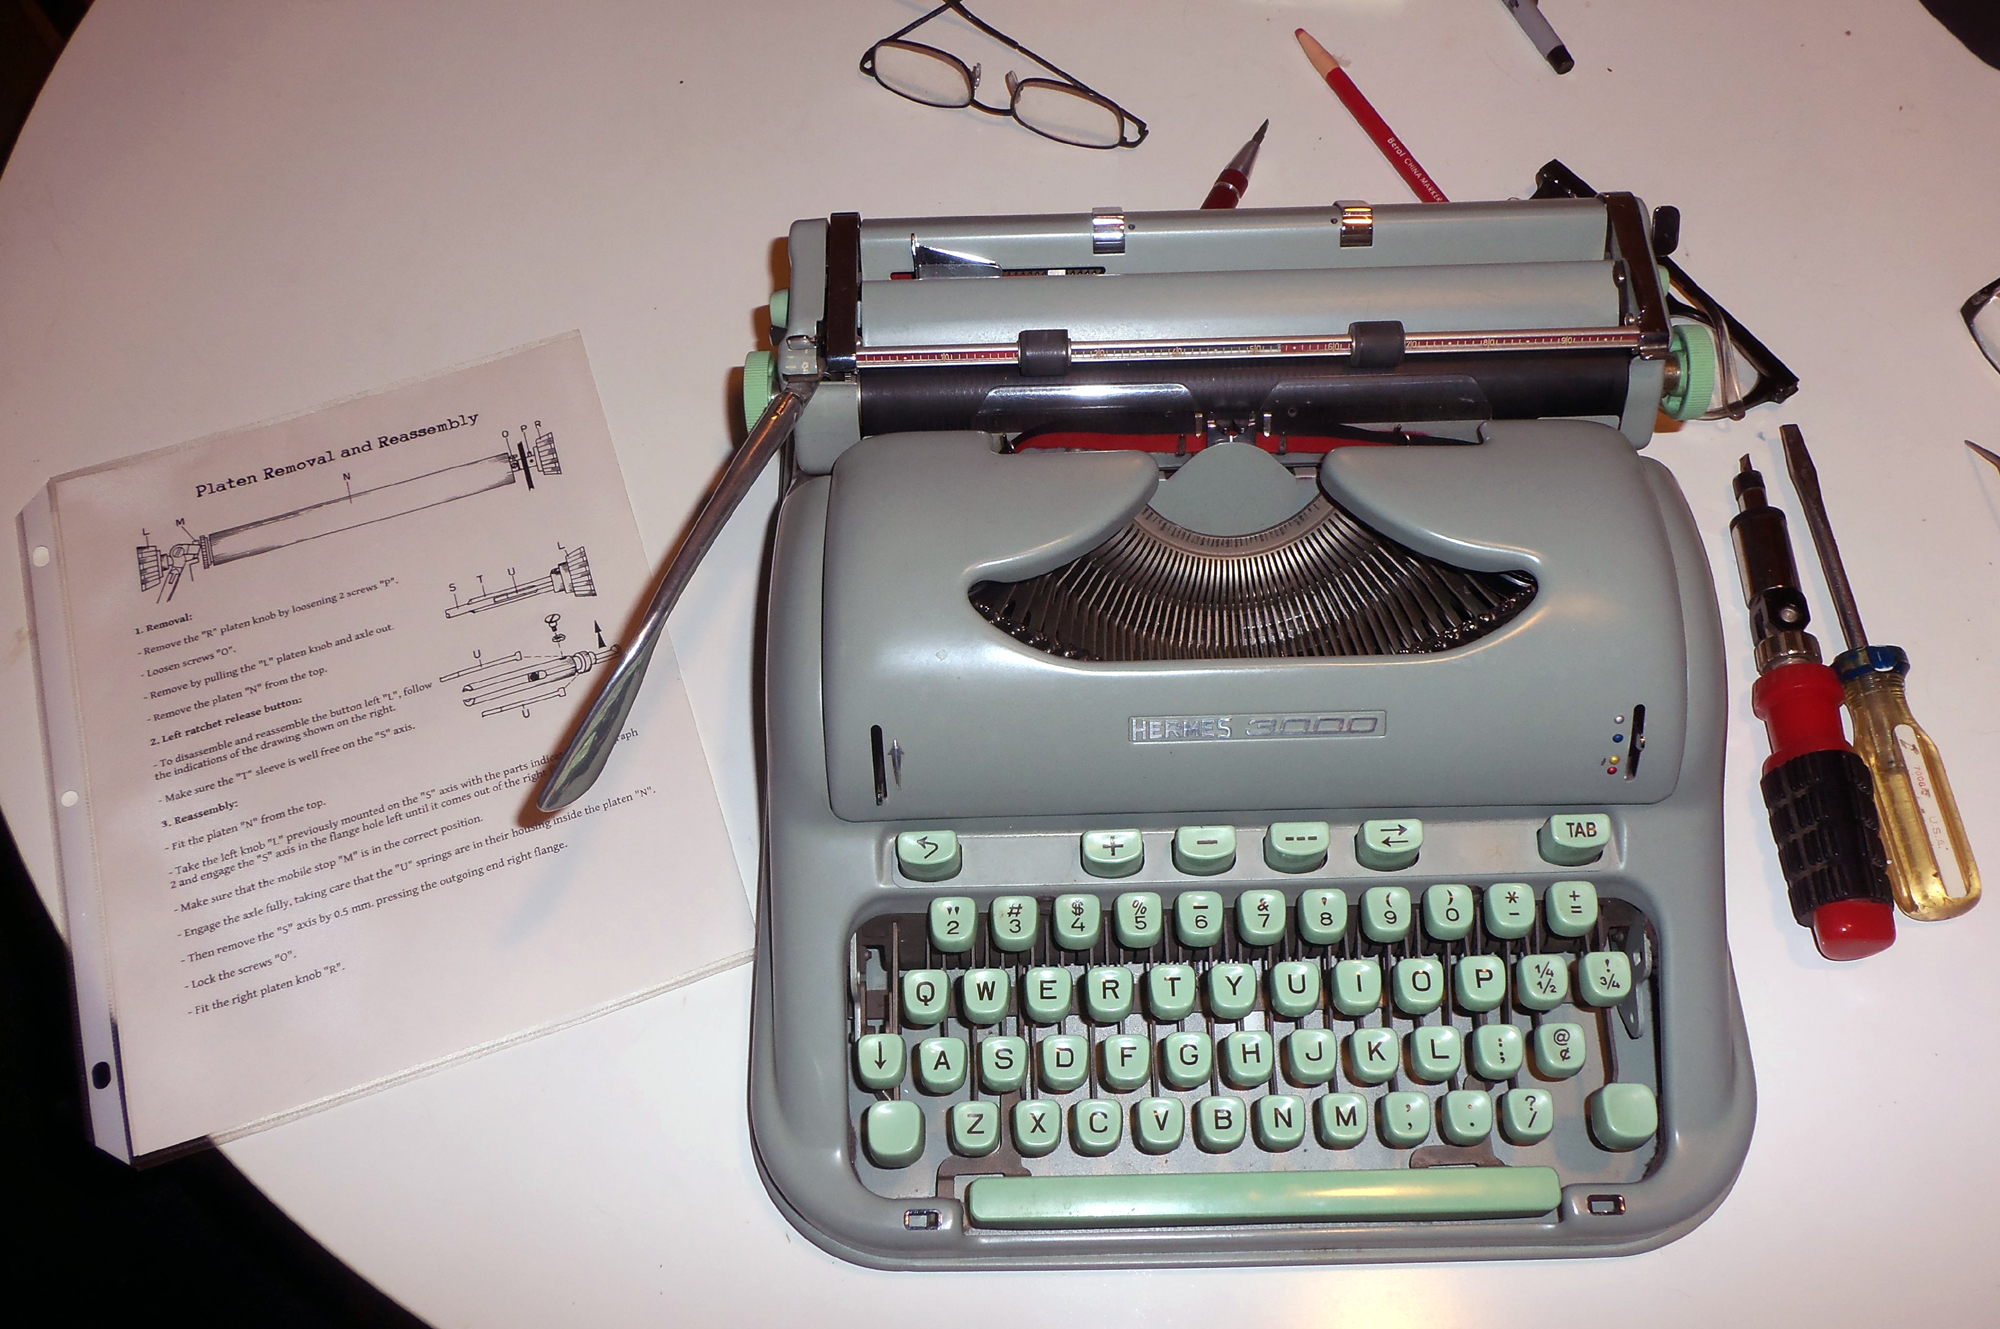
Easy, my 1964 Hermes 3000, has a pretty good platen in her already, but for the purposes of the experiment, she gets to be the guinea pig anyway.
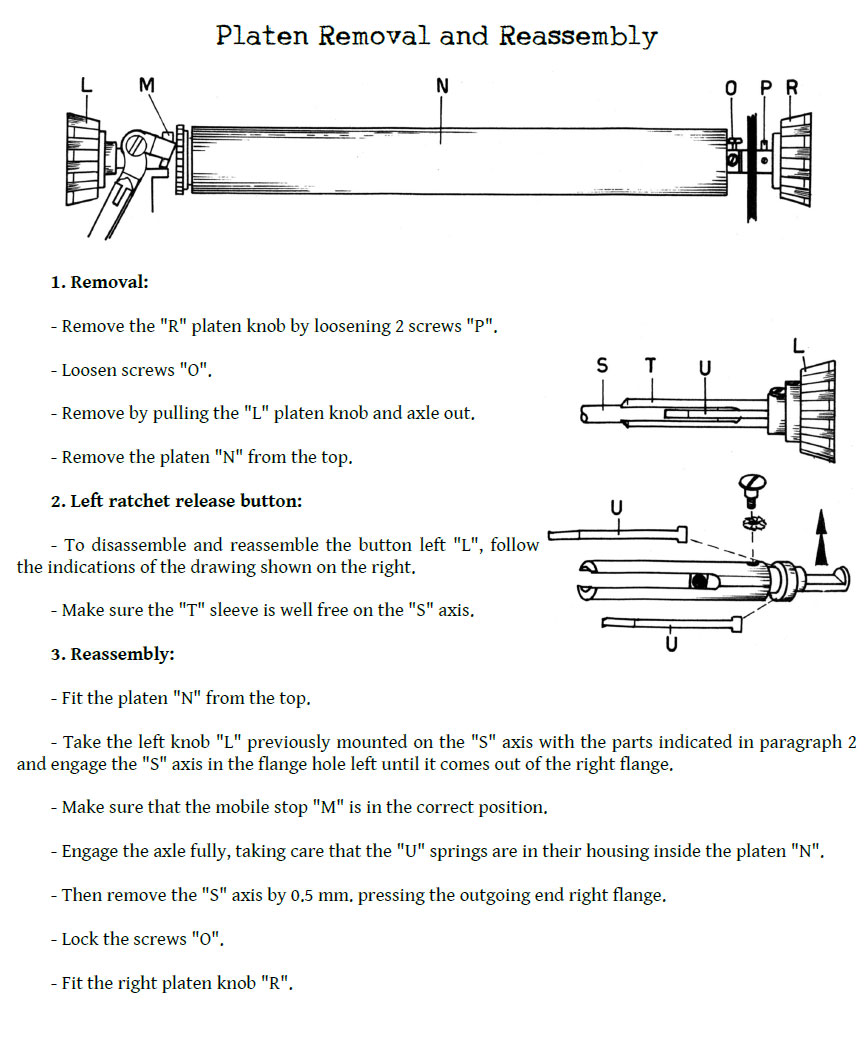
Platen removal/reinstallation from the upcoming Hermes 3000, Media 3, Baby and Rocket Typewriter Repair Bible.
Once I had the platen out, I cut a length of the shrink tube a little bit longer than the platen is. About a half-inch extra on each end.
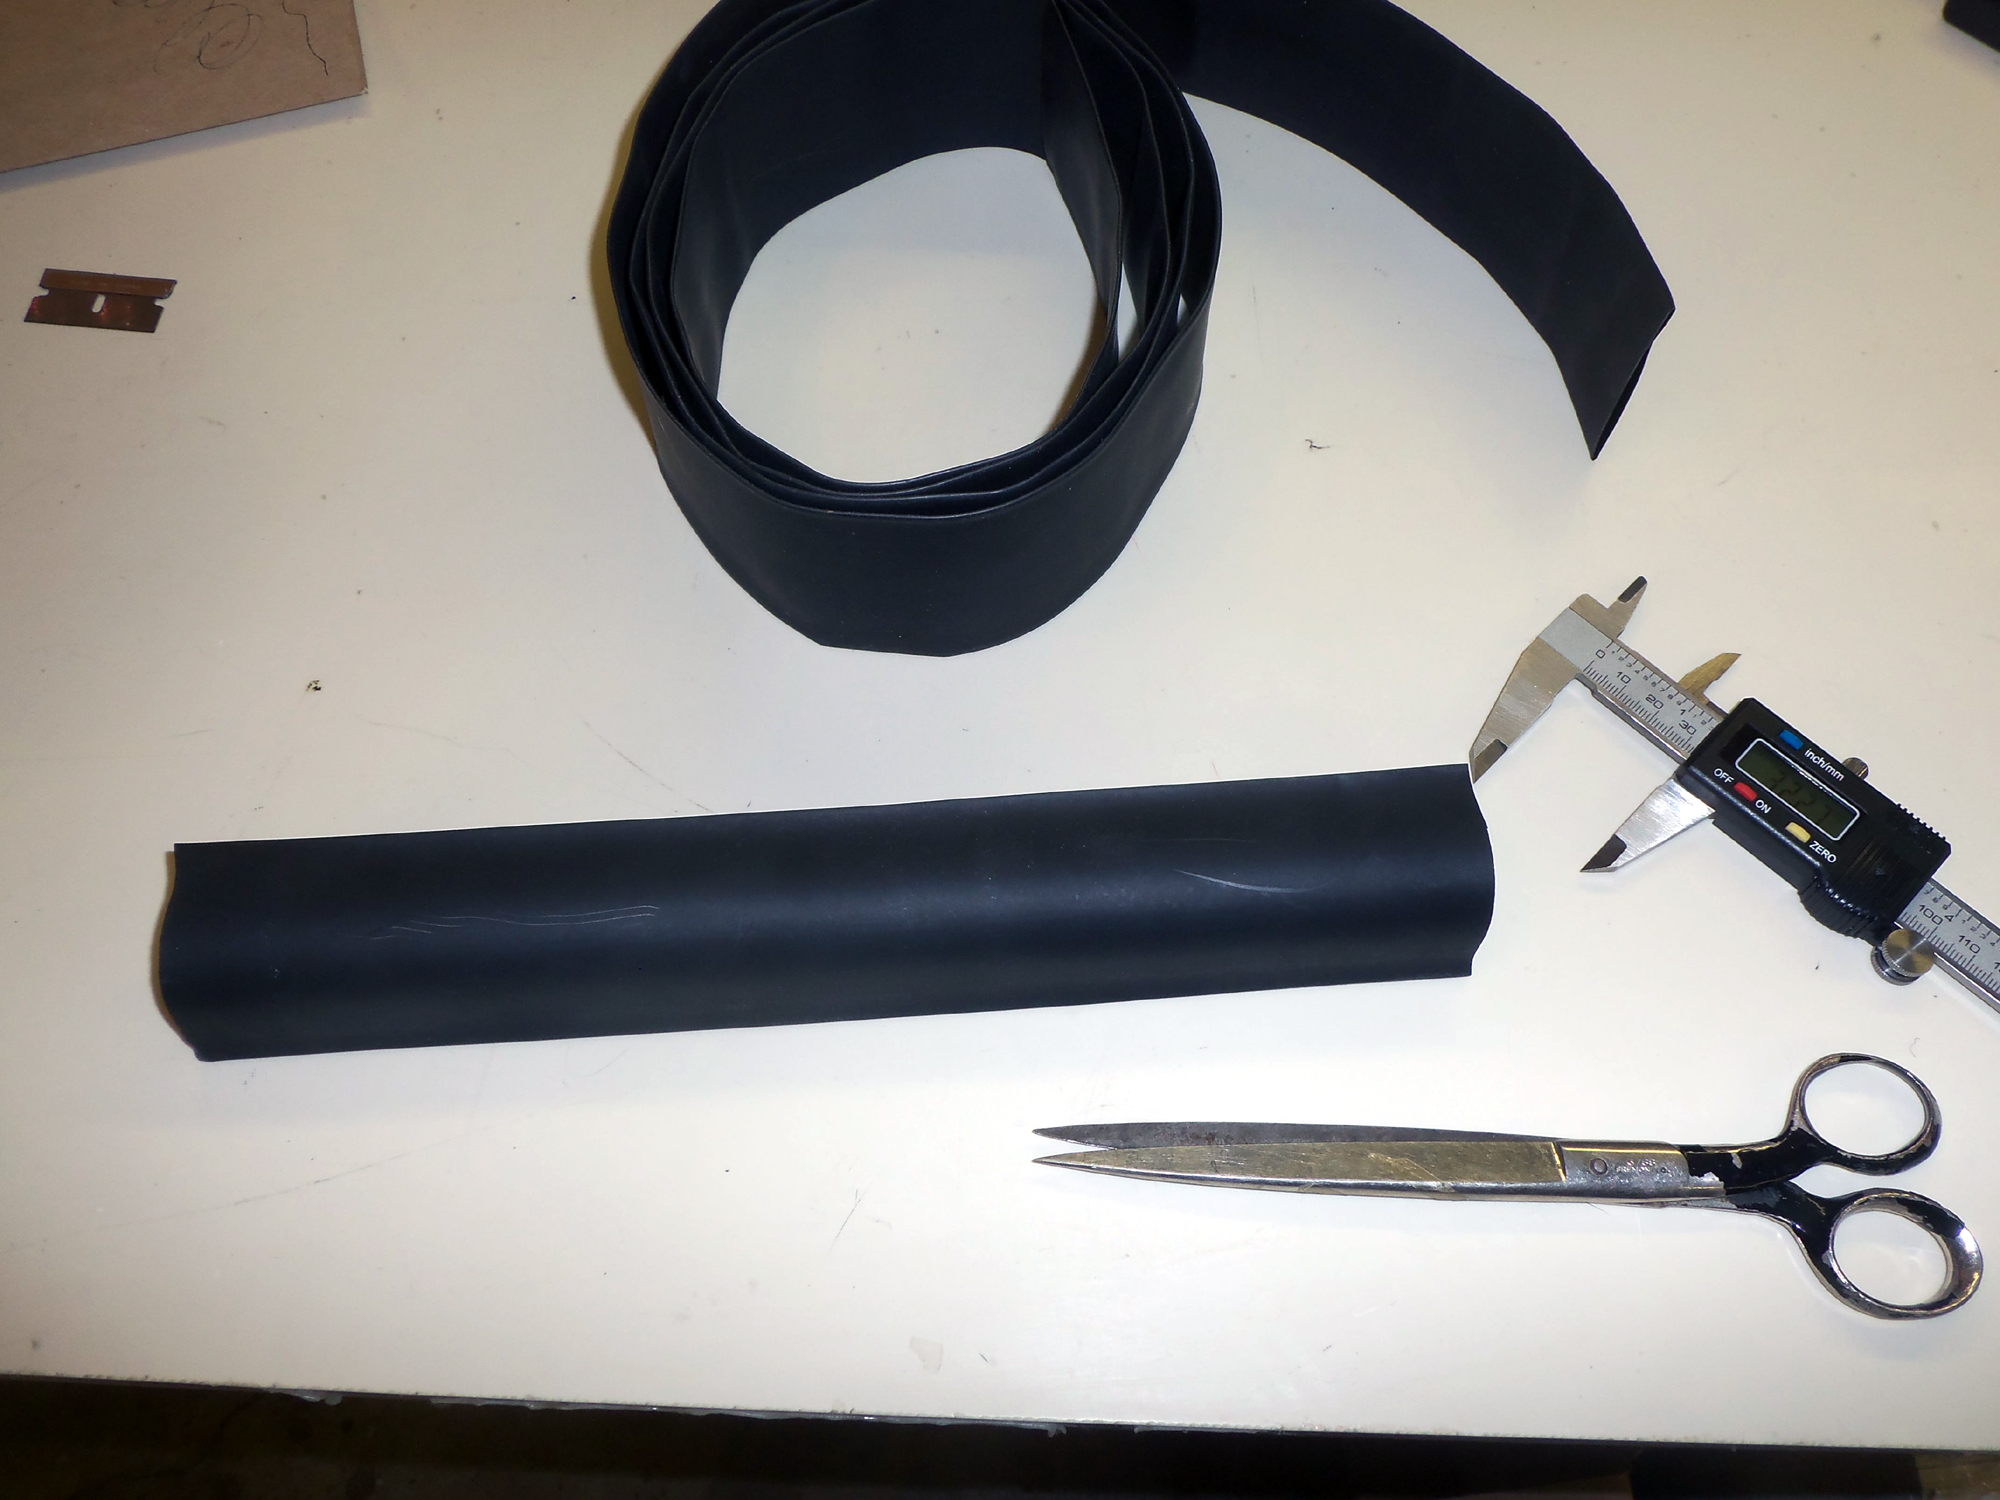
Alternate heating the tubing with rolling the platen on a clean, smooth surface to help with uniformity. start with the creased edges of the tube so you round those out first.
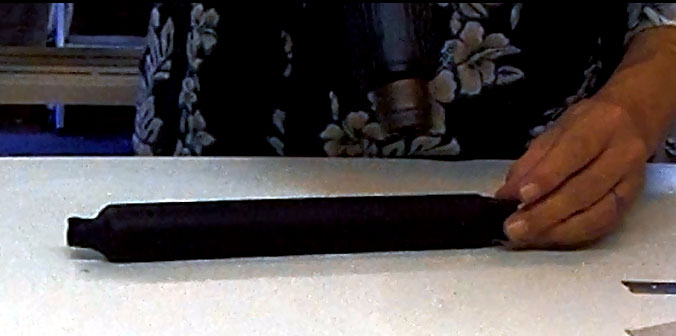
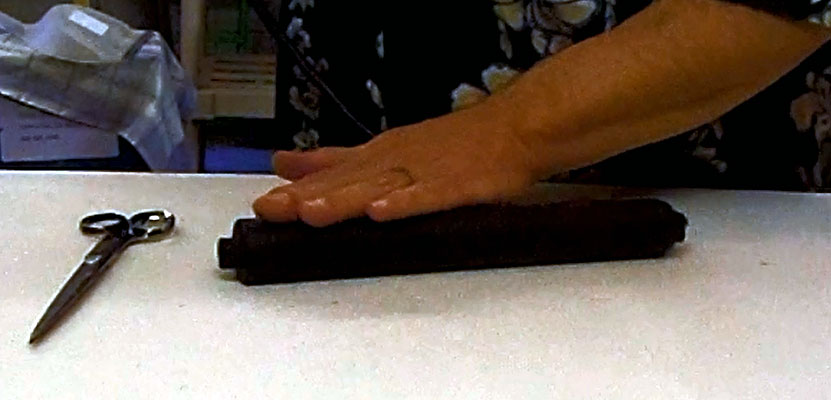
When the platen cools down and you are happy with the uniformity of the covering, trim excess tubing from ends of platen and replace into machine.

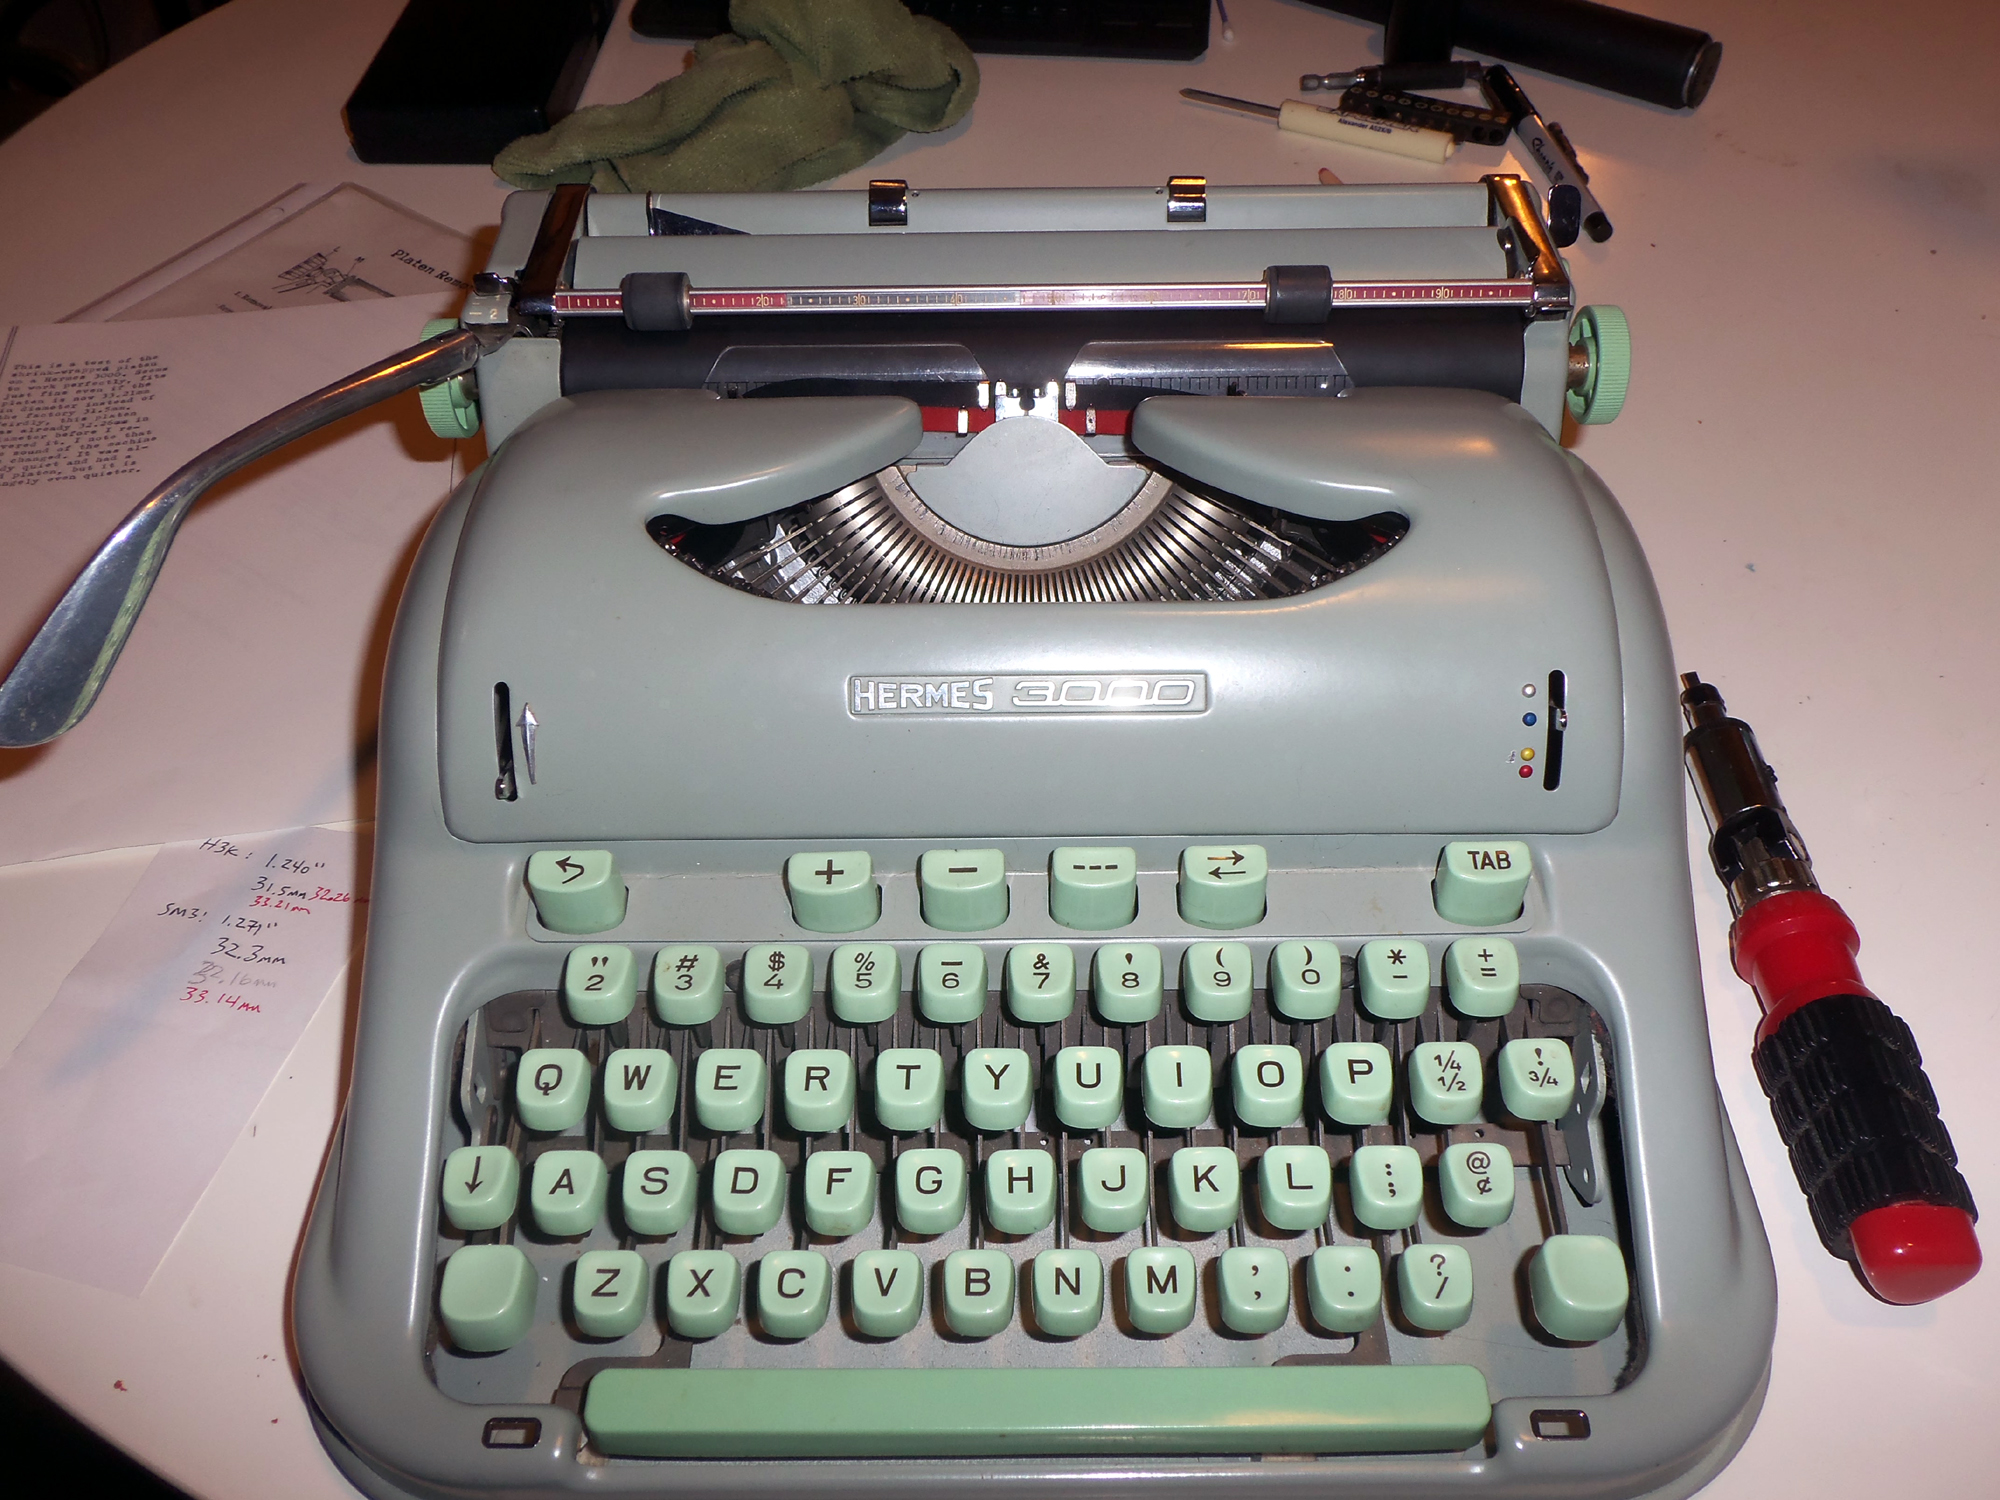
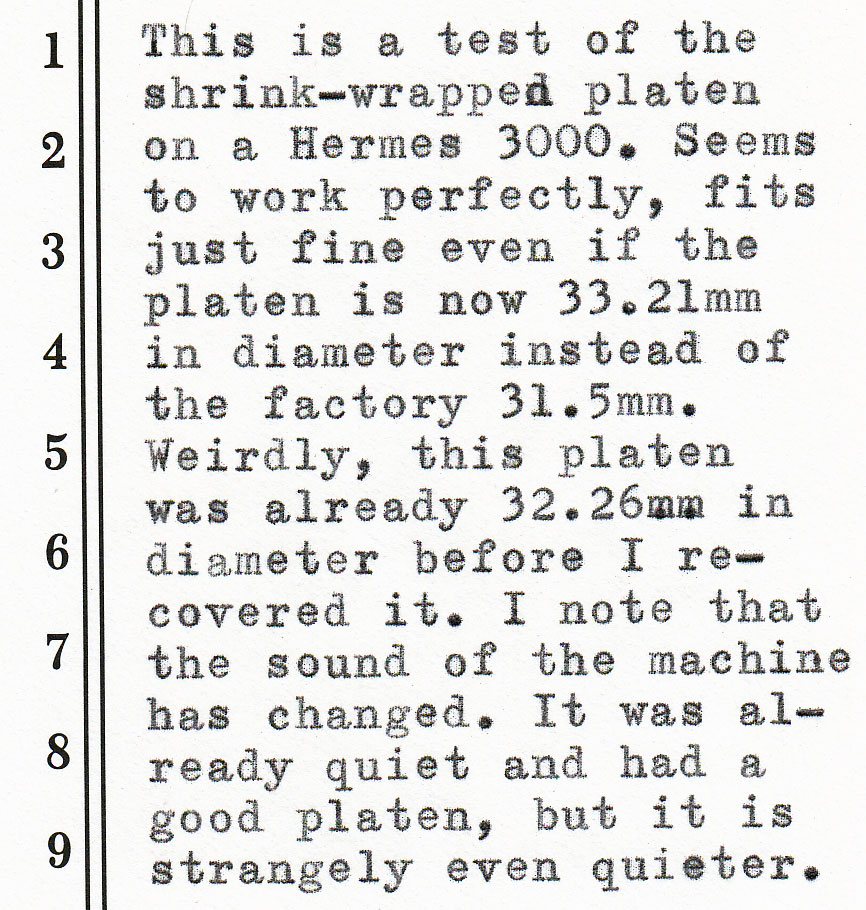
So yeah, it fits just fine and works great. Not as good as a professional full re-covering like you get at J.J. Short, but it’ll do if you’re cheap. It does quiet down the typing, pads the action a bit and helps with paper-cutting. It doesn’t solve it completely, as I noticed on my Olympia SM3, whose platen I also re-covered today, but it helps.
Where do you get this magnificent stuff? You can get it in rolls of 25ft or 100ft here. Look for the 3:1 shrink tubing that is 1 1/2″ to 1/2″, the order number is HS3-150-25FT for the 25ft roll. You can get it any color you want, pretty much, but the black one I used is HS3-150-25FT-BK.
Awesome post! I’m so glad it worked out!
Congratulations on your project.
I’ve never done any H3k, but I have done a few others. First time I did turn down the diameter on a lathe (sanding not using a cutter blade). Then I got lazy and did not turn down the platens. I think the spring loaded paper trays and pressure rollers make up the difference for larger diameters. Tom Furrier has a good step by step on changing out an H3k platen on his blog Life in a Typewriter Shop.
BTW, you can get heat shrink with adhesive inside and it will stick fast much better than plain heat shrink, but I’ve not noticed any difference in use. I generally have the weather proof (adhesive kind) for working on antennas and I got some really thick stuff to try from one of the linemen at the phone company.
Yep, I saw the adhesive ones, but the non-adhesive works fine, and I feel like adhesive would just get messy if I wanted to strip off the layer at some point in the future to re-cover again.
There does seem to be a lot of leeway in how big the platen can be, I was mostly worried about fit, but I can imagine that there will be cases where the extra 1mm or so will necessitate re-adjusting things like escapement trip & other settings that depend on the distance between slug & platen. Didn’t seem to be a problem this time, though.
Cool. I’ve used heat shrink to recover an Adler Special, and it typed fine. It’s not a typewriter I use much, so I can’t say how long the heat shrink will last. Not as long as a real new platen, I bet, but it is pretty tough. This is not a bad DIY solution.
I’m pretty sure I’ve seen this method bandied about the Typosphere before, I have a vague memory or either Clemens or notagain doing it years ago. I need one of them to pipe up and say what the longevity of the method can be, or I guess just wait a few years and find out myself. :D
Oh, the other machine I did this on was my pimped-out Purple Prose Producer. I used purple heat shrink, of course. I type on this one on special occasions. The typing has definitely left some indentations on the heat shrink, but it hasn’t broken or anything.
I wonder if you can smooth out the indents by applying a little heat? In any case, it’s good to hear that it lasts a few years without sagging or coming loose. Hopefully it lasts acceptably long under normal use too. (:
Hello! Nice post!
I’m having hard times trying to reassemble the carriage of a Hermes 3000. Could you give some tips on that please?
Hi,
Thanks for the detailed post!
I have a 60’s H3K, the platen is as hard as any I’ve seen, yet in this case, the paper is not being cut, it prints fine. Swiss engineering perhaps? Still, I’m considering this method. I have shrink tubing that looks like what you are using. I tried it on a Dreyfuss Royal, which has a soft platen, and It actually made it harder. I’ve been looking for the actual rubber shrink tube, but it appears it has been discontinued. Have you come across any of that? This type would not roll up flat- or rather would return to its round tubular shape once unrolled.
nope, just have this stuff shown in the post (:
Hi,
Thanks for the excellent post!
I have a sort of strange question, but did you heat the rubber until it didn’t shrink anymore? Or did you stop heating as soon as it was a snug fit?
Kind regards,
Gert-Jan
Snug fit. I heated it until it was smooth and round, with no bubbles or ridges.
Thanks!
How is the platen now? Still perfect?
I will replate my platen in a couple of weeks, depending on how fast the restoration/cleaning of my typewriter is going. Will keep you posted if you want.
seems to work fine (:
Thanks for this.
Two questions please.
1. Is the H3K service manual out? If so Id love to buy it.
2. If not, can you guide me on how to reassemble the index ratchet assembly which I accidentally dropped when taking off the platen.
Thank you.
https://typecast.munk.org/wp-content/uploads/2017/11/h3k-ratchet-1.jpg
Thanks so much for that diagram and repair tips. After three days of looking at it, I had come to the same conclusion that it had to be placed that way, but i was worried by a piece of spring which didn’t fit anywhere, which was strung along the mechanism of the ratchet. I finally found that it could be attached to the base of the upright “D” in your diagram. This spring allows for the Carriage Return lever to return back to its natural position after it has been used.
I decided to change the platen rubber after i had done a decent job on my Underwood Universal, but I seriously underestimated the delicate and intricate mechanism of the Hermes 3000. I am never opening up this machine again. Even when you know exactly what you need to do (for eg. the hub assembly for the index assembly, it is still so difficult to do it right).
And thank you once again.
Where do we secure the H3K service manual, please?
R.
Printed book:
https://www.lulu.com/en/us/shop/ted-munk/the-hermes-3000-and-media-3-typewriter-repair-bible/paperback/product-1jw9g267.html
PDF:
https://sellfy.com/p/klvafz/
The manual available on the Lulu site with Munk’s book, is for the 1966 service.
Is this good for the 1962 model also?
yes. 1958 through to the 1970’s model
Hello, I just purchased your wonderful manual, but I have a rather specific question about my newly obtained hermes 3000, perhaps you could help?
When I purchased, everything worked smoothly and perfectly, except one detail that I discovered. The carriage return lever would occasionally not engage properly to feed the paper through, and it seemed the only way to get it to engage again was to press the left knob into the typewriter, at which point the lever would engage again, advancing the paper. I’ve been taking the typewriter apart to service/clean it (hobbyist here, very amateur and just doing this for aesthetics) and made the mistake of pulling out the whole mechanism around the left knob trying to remove the platen (oops). Luckily with your manual I got everything back in place, but I discovered something along the way – what was happening to my carriage return lever. The whole piece I had pulled out and re-installed (which is attached to that left knob, with the small arms nestled into it) doesn’t fully enter the housing, the very top nubs of those arms (labeled U in your diagram) are still visible, and as the feed arm engages the ratcheting system that whole mechanism is slowly pushed out of its position in the housing. I have no idea what to do to get it fully into position. Any ideas? It’s functional still, but I’d love to get it in perfect working order.
Impossible to remotely diagnose via blog comments. I suggest a more interactive forum like:
https://www.facebook.com/groups/typewritermaintenance
You’ll want to take pictures or video of the issue to more clearly describe the issue.
I’m interested, now that some years have passed, how is the platen holding up?
actually pretty good. (:
Hey Reverend–I seem to have acquired a 1967 Hermes Ambassador, which as you know is a monster with a monster platen. Do you know offhand what size shrink tubing I would need to recover it? Everything about it is in extraordinary shape, except the very hard platen! It reportedly lived in the back of a closet for decades under a cheap plastic cover before materializing in an estate sale. A testament to the value of those hideous covers, I guess. I also wonder what private citizen owned one of these. If you weren’t Joan Didion, and didn’t make your living typing words, it seems you would have sufficed with a 3K. I read somewhere they are extremely rare in US, in part because of high excise tax on Swiss imports at the time, so business of the era would opt for Olympias. Thanks for your thoughts and wisdom!
Dunno, I haven’t had one long enough to measure the platen. Bust out your micrometer! (:
LOL! I know it is a 3-1 shrink ratio so I will let you know what I learn if I go for it. BTW it is the easiest platen to remove I have EVER seen: just twist the thingies inside both knobs and it lifts clean out. Genius. Thanks so much sir!
#:1, 2:1 I don’t think matters much. You’ll still have to do a ring/cylinder & On-feet/Motion adjustment afterwards. Process is probably similar to this: https://typewriterdatabase.com/1968-Ames_Standard_SVC.hermes-repair.manual